Arduino Clock with Matrix Display
Now, you do not have to use google translate for translate this page to english. You can just read blue text. Let me know if you find any mistakes.
If you like this clock, you can donate on Patreon, or IBAN: CZ9861000000001019937201 or just write something to discussion part under this article or send some photo of your clock to info@mylms.cz. Thank you.
Tak jsem se pustil opět do nějakého Arduino bastlení. I když nerad vyrábím věci, které lze běžně koupit…sešlo se mi tu pár maticových displejů, RTC modul a nějaký to Arduino. Stačilo přidat kus jeklu, pár řádků programu a mám hodiny s maticovým displejem.
Původní myšlenka byla vyrobit jednoduché hodiny, které mají svítící displej. Žádné píčoviny, které by v noci působily rušivě – stačí blikání dvojtečky jako signalizace chodu. Pro mě není ani potřeba bateriové napájení, nebo desítky různých funkcí. Prostě jenom kostka, která bude zobrazovat čas v tmavé místnosti.
Let me show you my Arduino clock with matrix display. I do not like to make ordinery thing what you can ussualy buy. But I wanted a simple clock which can show only time (hour and minute) without any animation and other disturbing elements. Well I have made this clock with Arduino nano (Chinese clone) and four matrix dot displays.

Hodiny jsou velmi jednoduché. Zobrazovací část je založena na čtyřech maticových displejích 8*8 bodů s řadičem MAX7219. Z Číny jde objednat přímo modul se čtyřmi displeji na jedné desce. Dále obvod obsahuje modul reálného času DS3231, klon Arduino Nano a dvě tlačítka. Celek je napájen 5V adaptérem.
Clock construction is really easy. Display is based on four matrix displays (8 x 8 pixels) with MAX7219 driver. I ordered one module with 4 displays on one board. Next, there are real time clock module with DS3231, Arduino Nano (Chinese clone in my case) and two push butons. I use external 5V power supply.
Konstrukce je vyrobena z jeklu 50×30 mm s vyfrézovaným otvorem pro displej. V něm je kvůli zvýšení kontrastu vloženo červené plexi. Vzadu jsou otvory na pověšení a nahoře dvě dírky s mikrospínači pro ovládání např. párátkem.
Body of clock is made from steel profile 50×30 mm with milled hole for display. I used red acrylic for make better contrast of display. There are some holes – for hanging on the back and two small holes with push buttons on the top.
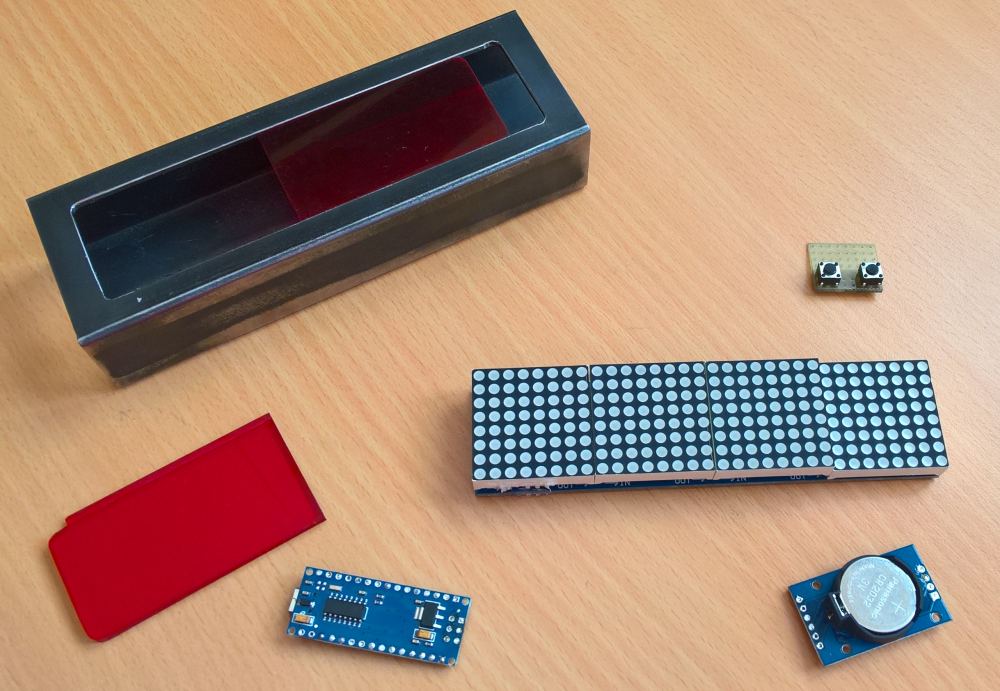
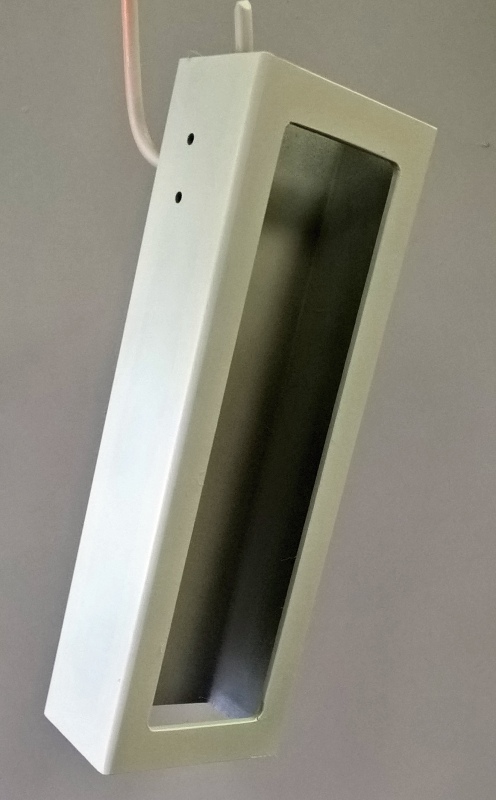
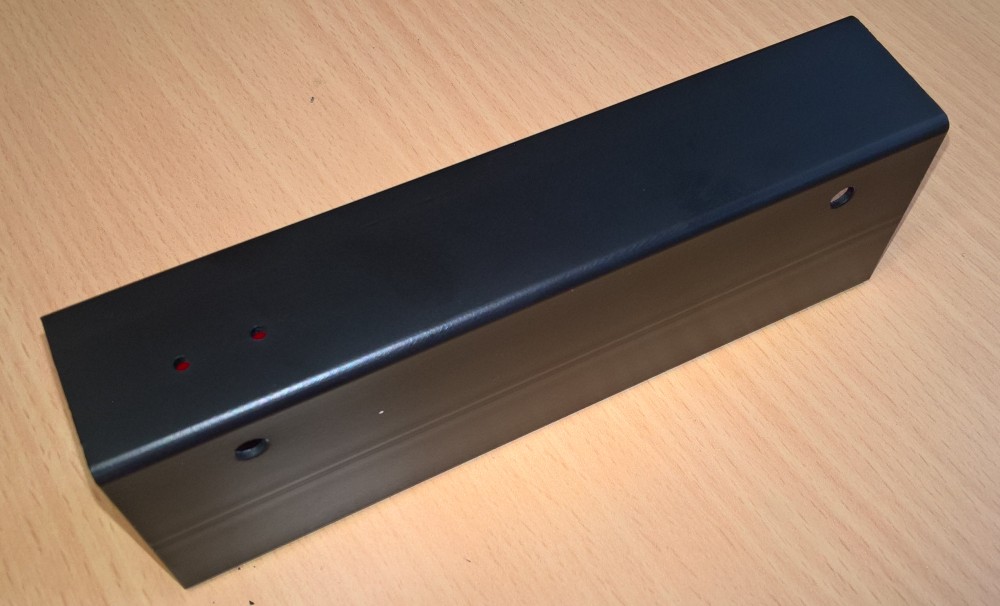
Kvůli úspoře místa (maximální šířka všeho cca 25 mm) jsem musel displeje připájet na desku přímo. Vypájel jsem tedy dutinkové lišty a displeje do desky zapájel.
There is not enough space in the steel profile (maximum width is only 25 mm). I had to solder all displays directly to pcb for save some space.

Na horní straně jsou na univerzálním tišťáku dva mikrospínače. Oba připojují piny Arduina na GND. V procesoru je nastaven interní pull-up. Nejsou tedy potřeba žádné dodatečné součástky.
There are two push buttons on the top of board. Both connect inputs from Arduino with GND. Internal pull-up resistors are set in processor. No additionals resistors are necessary.

Na zadní straně je vše propojeno. 5 V je přivedeno na všechny komponenty. Protože už používám stabilizovaný 5V zdroj, není přívod přiveden na pin VIN Arduina, ale přes diodu 1N4148 přímo na pin 5V. Kdyby bylo napájení přivedeno na vstup VIN byl by stabilizátor na desce zatěžován velkým procházejícím proudem pro LED displej.
All modules are connected with 5 V bus. Because I use external 5V power supply, I do not have to use VIN pin, but directly (via the 1N4148 diode) to 5V pin. If I used VIN input, the integrated stabilizer would be overloaded with the display current!
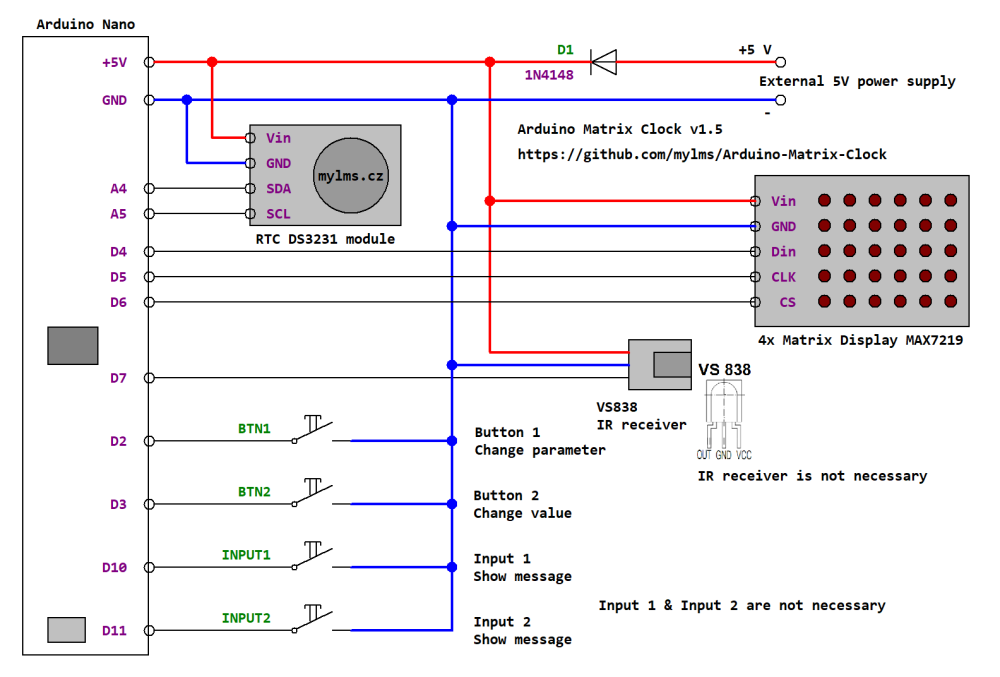
Zapojení pinů Arduina:
- D2 – button 1 (connect GND, set internal_pullup)
- D3 – button 2 (connect GND, set internal_pullup)
- D10 – input 1 (connect GND, set internal_pullup)
- D11 – input 2 (connect GND, set internal_pullup)
- D4 – matrix display, pin DIN
- D5 – matrix display, pin CLK
- D6 – matrix display, pin CS
- D7 – VS838 IR receiver
- A4 – RTC modul, pin SDA
- A5 – RTC modul, pin SCL
- GND – společné pro všechny moduly | common for all modules
- 5V – společné přes všechny moduly, přívod přes 1N4148 (na fotce není) | common for all modules

Program si můžete stáhnout zde, na mém GitHubu: https://github.com/…Matrix-Clock
You can download program from my GitHub: https://github.com/mylms/Arduino-Matrix-Clock
Program hodin je poměrně jednoduchý. Používám knihovnu LedControl na ovládání maticových displejů a knihovnu Wire pro komunikaci přes I2C. Pro komunikaci s RTC se nepoužívá žádná dodatečná knihovna. Na začátku programu jsou nadefinované jednotlivé znaky. Čtení aktuálního času volám cca jednou za 500 ms. Zároveň v tomto čase blikám s dvojtečkou – dvojtečka se tedy rozsvítí cca jednou za sekundu (pokud je zapnuté blikání).
Sketch is really simple. It use LedControl library for matrix display. Library Wire is used for I2C communication. For communication with real time clock module is not used any other library. At the beginning of the sketch all symbols are defined. Read actual time from RTC is twice a second. Colon blinking (only if blinking is active) in the same interval.
Hodiny je možné nastavit pomocí dvou tlačítek na vrchní straně. Stisknutím obou tlačítek zároveň se hodiny přepnou do režimu nastavení. Levým tlačítkem (BTN1) se přepíná parametr, který se mění, pravým tlačítkem (BTN2) se parametr zvyšuje. Po nastavení všech údajů se hodiny tlačítkem přepnou do režimu zobrazení aktuálního času.
It is possible to set clock with two buttons. When both buttons are pressed, clock goes to setting mode. Left button (BTN 1) can change the parameter, right button (BTN 2) change value of parameter. After set all parameters is clock bring back to show actual time.
Ve verzi 1.0 a 1.1 je možné měnit pouze čas – hodiny a minuty. Dále pak intenzitu svitu displeje a font. Možné je nastavit čas pomocí sériového portu.
In version 1.0 and 1.1 clock can show only time – hours and minute. It is possible to change brightness and font. All parameters can be change via serial port.
Od verze 1.2 lze v menu měnit hodiny (H), minuty (M), rok (y), měsíc (m), den (d), formát 12/24 hodin (/), zobrazení data (D), font (f), styl dvojtečky (:), intenzitu osvětlení (b), otočení fontu ( R ), otočení displeje ( r ). Po nastavení všech parametrů se zobrazí na displeji nápis „Strt“, po stisknutí tlačítka BTN1 se sekundy nastaví na 0 a hodiny se rozběhnou. Stejně tedy jako v předchozí verzi.
Dále lze hodiny nastavit snadněji pomocí sériového portu (oproti předchozím verzím se liší styl zápisu). Rychlost sériové linky je 9600 baud. Je nutné odeslat přes sériovou linku vždy 3 znaky. První slouží jako příkaz, další dva jako číslo ve standardním desítkovém formátu (00 – 99). U čísla je vždy nutné zapsat dvě číslice. Příkazy se shodují se znaky v menu. Odesláním znaku otazníku „?“ do hodin se vypíše aktuální čas a nastavení.
From version 1.2 i’ts possible to change hour (H), minute (M), year (y), month (m), day (d), 12/24 clock format (/), show date (D), font (f), colon style (:), brightness (b), font rotate ( R ), display rotate ( r ). After set all parameters is „Strt“ shown. After press BTN1 are second set to 0 and clock goes to start. It is same like in older version.
Clock can set via serial port. Speed is 9600 baud. Three characters must be send. First is command, second and third are number in decimal notation (00 – 99). Commands are the same like in menu. After send „?“ clock send help back to serial monitor.
Od verze 1.3 lze navíc otočit font vzhůru nohama a zobrazit aktuální teplotu, která je načítána z RTC modulu. Teplota je tedy přibližná a ovlivněna teplotou samotného modulu.
From version 1.3 it’s possible to turn font upside down and show temperature. Temperature is readed from real time clock module. Temperature is only approximate and depend on temperature of RTC module.
Od verze 1.4 je možné otočit text tak, aby byl čitelný vertikálně (parametr v00/v01). Lze tedy hodiny použít na výšku. Dále je možné připojením vstupu D10 a/nebo D11 na GND zobrazit jeden ze třech textů. Ty je nutné upravit přímo v kódu.
From version 1.4 it’s possible to turn display vertically (parameter v00/v01). Now you can turn clock like „portrait“. Next, if you connect input D10 and/or D11 to GND you can show one of three messages.. Messages must be changed directly in the code.
Od verze 1.5 je možné invertovat zobrazení displeje a používat IR dálkové ovládání. Do programu je nutné zadat kódy jednotlivých tlačítek dálkového ovladače. Kódy jsou definovány od řádku 140. Jsou použity tři tlačítka – jedno simulující tlačítko 1, druhé simulující tlačítko 2 a třetí simulující stisk obou tlačítek.
From version 1.5 it’s possible to invert display and now, you can use IR remote control. It’s nessesary to add three codes to sketch – see row 140. Buttons of the remote control just simulate hardware button btn1 and btn2. Button3 simulate press both buttons at the same time (menu).
Nastavení pomocí sériové linky:
- ? – výpis hodnot z hodin
? – read all data from clock
- H – hodiny (např. H15 = nastaví 15 hodiny); 00 – 23
H – hour (e.g. H15 = set 15 hours. 24h mode is used); 00-23
- M – minuty (např. M22 = nastaví 22 minut); 00 – 59
M – minute (e.g. M22 = set 22 minute); 00 – 59 - S – sekundy (např. M10 = nastaví 10 sekund. Pouze po sériové lince); 00 – 59
S – second (e.g. M10 = set 10 second. Only via serial communication); 00 – 59 - y – rok (např. y19 = nastaví 2019); 00 – 99
y – year (e.g. y19 = set 2019); 00 – 99 - m – měsíc (např. m03 = nastaví březen); 01 – 12
m – month (e.g. m03 = set March); 01 – 12 - d – den (např. d31 = nastaví 31. den); 01 – 31
d – day (e.g. d31 = set 31st day); 01 – 31 - D – kolikátou sekundu se zobrazí datum (např. D40 = datum se zobrazí od 40. sekundy); 00 – 60
D – which second is date shown (e.g. D40 = date is shown from 40th second); 00 – 60 - t – kolikátou sekundu se zobrazí teplota (např. D00 = teplota se nebude vůbec zobrazovat); 00 – 60
t – which second is temperature shown (e.g. D00 = temperature is not shown); 00 – 60 - / – nastaví režim 12/24 hodin (/00 = 12h režim, /01 = 24 h režim); 00 – 01
/ – set 12/24 clock mode (/00 = 12h mode, /01 = 24h mode); 00 – 01 - f – font (f01 = nastaví 1. font); 01 – 05
f – font (f01 = set 1st font); 01 – 05 - : – styl zobrazení dvojtečky (:00 = zhaslá, :01 = stále svítí, :02 = bliká); 00 – 02
: – colon style (:00 = not shown, :01 = always lit, :02 = blinking); 00 – 02 - b – intenzita osvětlení (b00 = nastaví nejmenší intenzitu osvětlení); 00 – 15
b – brightness intensity (b00 = set lowest intensity of brightness); 00 – 15 - R – otočení fontu (R00 = vypne otočení fontu); 00 – 01
R – font rotate (R00 = turn off font rotating); 00 – 01 - r – otočení displeje (r00 = vypne otočení displeje); 00 – 01
r – display rotating (r00 = turn off display rotating); 00 – 01 - U – otočení fontu „vzhůru nohama“ (U00 = vypne otočení); 00 – 01
U – turn font upside down (U00 = turn off upside down mode); 00 – 01 - v – hodiny vertikálně (v00 – hodiny horizontálně, v01 – hodiny vertikálně); 00 – 01
v – vertical mode (v00 – horizontal mode, v01 – vertical mode); 00 – 01 - i – invertovat displej (i00 – standardní zobrazení, i01 – invertované zobrazení); 00 – 01
i – invert display (i00 – standard, i01 – invert display); 00 – 01

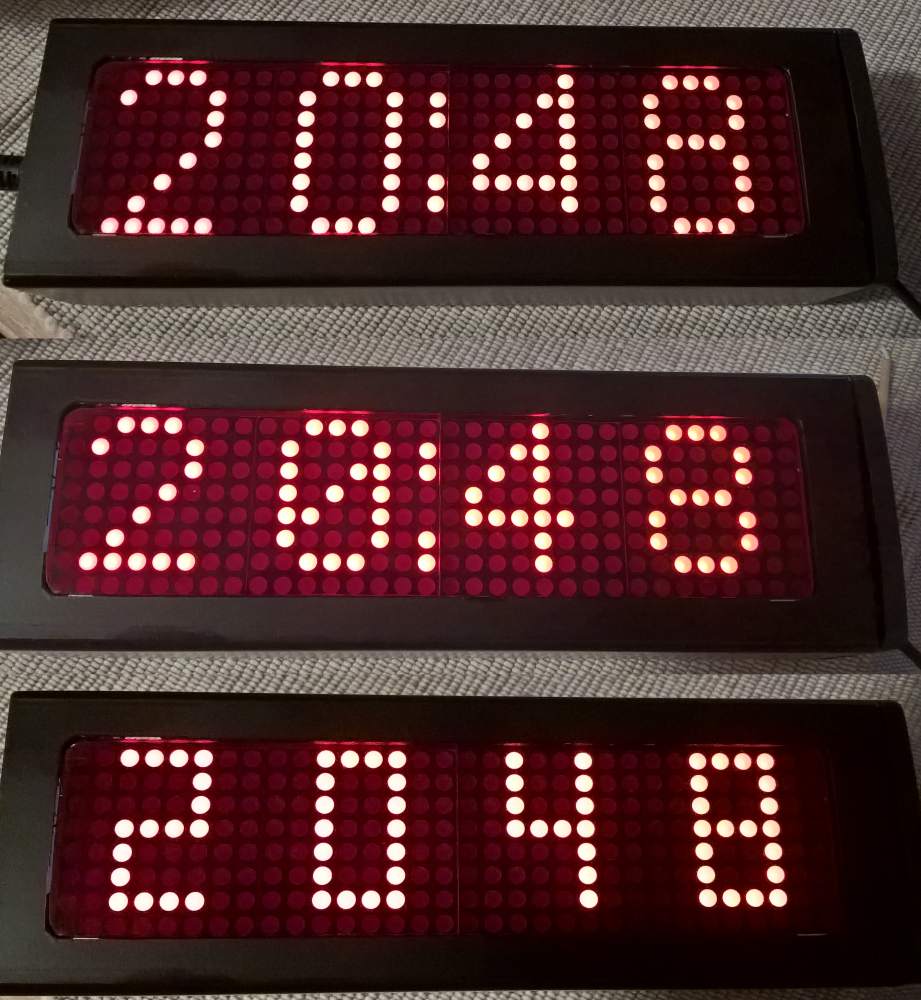
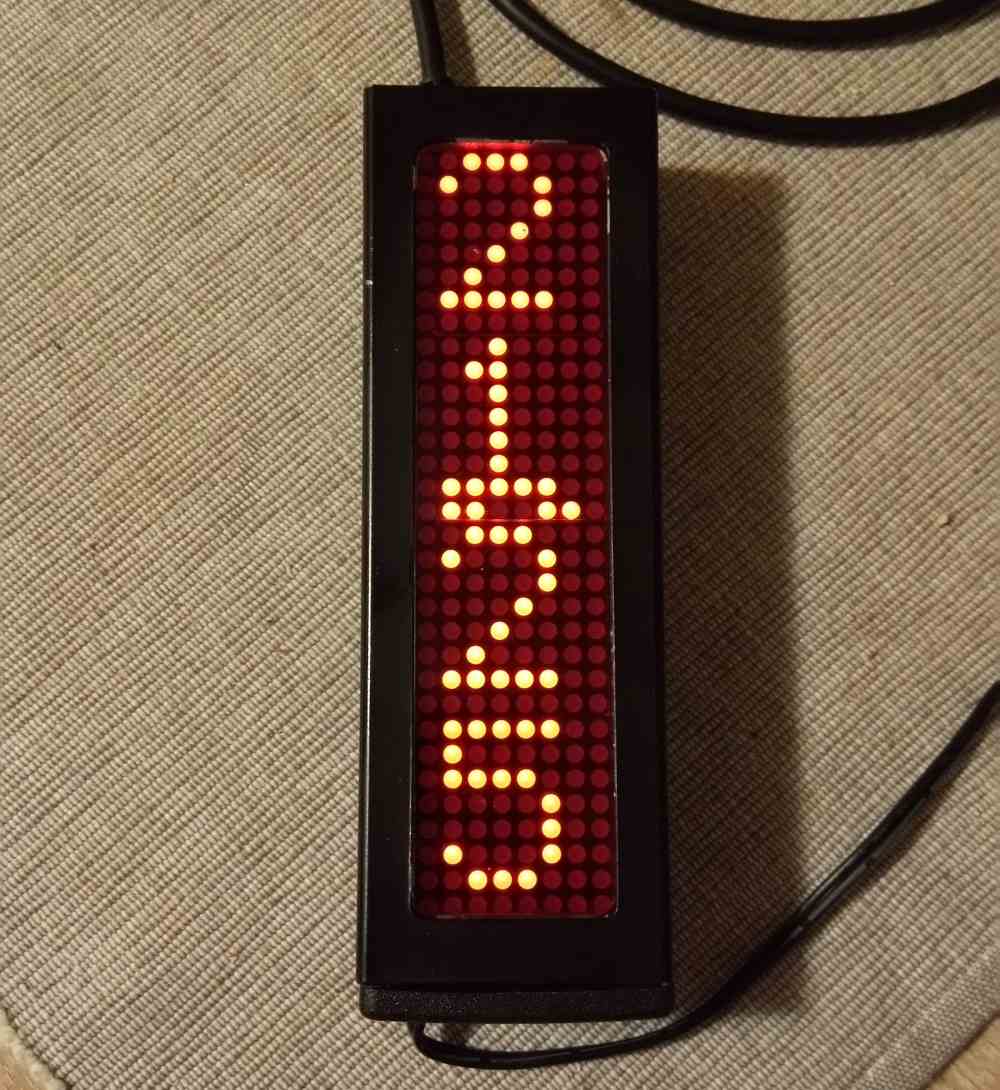
Protože je USB konektor jednoduše přístupný z levé strany hodin, lze jakoukoliv funkcionalitu (měření teploty, automatický přechod z letního času na zimní, apod.) dodělat.
Because USB port is accessible from left side, it’s easy to add some new function.
Upgrade by Patrizio (this function is avaliable in v 1.4)
V této verzi byla přidána možnost zobrazit uživatelný text (grafiku) v závislosti na dvou digitálních vstupech. Funkci jsem přidal přímo do verze 1.4.
In this version is avaliable show some user texts (depends on digital inputs). This function is included in version 1.4.
Upgrade by Johnny
Úprava programu pro zobrazení času na displeji 32×16 bodů. Úpravu provedl přímo Johnny podle diskuze pod článkem zde a zde. Upravený firmware si můžete stáhnout přímo zde.
This upgrade allows use bigger display for show time. You have to use 8 LED matrix display with all resolution 32*16 pixels. You can download upgraded firmware right here – author of this version is Johnny, it’s based on Arduino Matrix Clock v 1.4. Discussion about this upgrade you can read here and here.
thank you for your matrix clock project.I have done the assembly according to your schmetic. Thn loaded the sktech into arduino. on matrix its is showing 45: c5 only.I am trying to set the clock, but after setting hour and minute through the buttons than brightness, strt is coming out on display. and if i push the button again then 45:c5 is displaying on matrix led. nothing else, please help
If you have right address, you should test only RTC clock with Arduino board. Use simple Arduino sketch for read time from RTC and send to serial port. I recomend this sketch. It’s simmilar to my sketch…but it send data directly to serial port. Or, there are lots of examples on the internet. You can try that. Is it working? Is time right?
If not, maybe your RTC module is dead (did you try to change battery?) – at last, try to change RTC module.
thanks, i made 5nos clocks ,working perfectly!
tusita
Sri lanka
Peťan: Good to hear it. Nice job 🙂
Po zadani ? pres seriovou komunikaci se mi nevypisuji nstavene parametry. Ostatni yadavani parametru funguje. Nevite, kde je problem?
Thank You Very Much. Lots of Thank. Your guidance have helped me out to make this clock. Its working now. Keep it up. Keep posting on your blog/ web site.
Indra from India.
My RTC was faulty. I have installed new one and after finding out right 12 c address as you have instructed everything is now going smooth. Thank You again. Greetings to your country also.
You can download a new version (v1.1.) of firmware for this clock. It’s support more „fonts“ and you can hide colon betwen hours and minutes.
[3] Indra: Excellent project Petean.
Please let me know how to change the below:
F: Font (show nr of font in select font style)
:: Dot style (0 – hide, 1 – show, 2 – blinking)
How to download and select these options and change through the Agnes tool?. I’m not able to understand from the video.
Thanks in advance.
Hi Petean, It’s working fine. Able to change the font style and blinking with new version 1.1.
Many thanks and Wish you a Happy Newyear 2019.
Prejeyi gördüm ve çok beğendim kolaylıkla yaptım sıcaklık fonksiyonu olsa idi daha güzel olacaktı yinede emeği geçen preje sahiplerine çok teşekkür ederiz
My problem is I can’t rotate the display.Sir please help me to do your project.
If you need rotate only each numbers (not to change their possition) you have to change „byte ByteRevers(byte in) {„ function. Or omit this function.
If you need change the possition of each numbers (ie. reverse) you have to change „DrawSymbol“ function. You have to change „adr“ value.
Maybe this picture could help you.
Sir i am getting error . Can you help me by sending the full code of your project after rotating it 90 degree.I am totally new sir please help me.
ByteRevers(byte in) {
byte out;
out = 0;
if (in & 0x01) out |= 0x80;
if (in & 0x02) out |= 0x40;
if (in & 0x04) out |= 0x20;
if (in & 0x08) out |= 0x10;
if (in & 0x10) out |= 0x08;
if (in & 0x20) out |= 0x04;
if (in & 0x40) out |= 0x02;
if (in & 0x80) out |= 0x01;
return(in);
}
Or send me a photo. I don’t know how the font rotated is.
Hi

Greetings and thanks for your wonderful Clock concept. Haven’t peek your code yet, but loaded it into AVR (Atmega328P) and built on a Breadboard. Snap attached.
Cheers
Peťan: I’m pleasure your clock works 🙂
Thanks for the clock circuit works .perfectly!
tusita
from Sri lanka
This is a request whether its possible for you to add a display option like the below picture. As I’m not a coder, can’t figure out how the plot is done. But, the first three Matrices were used for Hour, Minute and Colon display: and the last for counting Second.
Thanks in advance.
Petan: Yes, it is posible, but it could be little difficult to implement it. The function „DrawSymbol“ can draw only one symbol (from font library) into one display. This function requires draw more than one symbol into one LED matrix (some font are too width). And of course make a new font for second. It could be a good function for next version. You can try to make it 🙂
Dobrý den, vaše hodiny se mi moc líbí, možná to bude znít hloupě, ale šlo by přidat rotaci o 90° vpravo nebo vlevo?
Chtěl bych hodiny použít vertikálně. V knihovně LedControl jsem tuto možnost nenašel.
Děkuji za jakoukoli adpověď
Martin Žák
Peťan: Asi by to nemusel být problém. Až budu mít čas zkusím na to mrknout a zakomponovat to tam. Ale než budu mít čas, tak můžete zkusit na řádku 1096 přepsat příkaz lc.setRow(adr, j, ByteRevers(row)); na lc.setColumn(adr, j, ByteRevers(row));. Ale nezkoušel jsem to.
Díky, ve verzi 1.3 to je řádek 1079, měl jsem to zrcadlově otočené, pomohlo R=01
A dvojtečka má takové divné zákmity…
Pokusím se udělat video…
Peťan: Vycházím z číslování řádku na GitHubu. Na řádku 1079 je začátek funkce, samotné vykreslování probíhá na řádku 1096. Dvojtečka je vykreslována sólo. Tím že to je přetočené, bude potřeba asi upravit i tuto část kódu.
Video: https://youtu.be/9n4iv5Ukofk
Peťan: Ty LEDky blikají, protože se vykreslují po řádcích a čísla po sloupcích. Takže se dvojtečka sice vykreslí, ale zase přemaže posledním řádkem. Od řádku 1101 se vykresluje dvojtečka. Nahraď (adr == 2 && dotStyle > 0) za (adr == 2 && i ==7 && dotStyle > 0). A pak pod tím odstraň podmínky, aby se jenom vykreslovalo. Stejně by se to muselo řešit u dvojtečky teploty.
Udělal jsem úpravy podle rady a nelíbilo se mi kde ty dvojtečky blikají,
tak jsem je posunul na bok…
Moc děkuji za pomoc.
Video: https://www.youtube.com/watch?v=0ACb7JM9uO8
Peťan: Jó, není za co. Hlavně, že hodiny makají 🙂 Kdyžtak jde to blikání přepnout na trvalé svícení nastavením parametru „:01“
A kompilace mi hází chybu:
avrdude: stk500_disable(): protocol error, expect=0x14, resp=0x00
avrdude: stk500_disable(): protocol error, expect=0x14, resp=0x00
ale chodí to, asi chyba u mě…
Peťan: Těžko říct, ale pokud to nahraje kód do procesoru, tak bych to neřešil.
Hello
1.4 installed it worked smoothly.
thanks
Peťan: Good to hear it 🙂
Zdravím, super práce… vyzkoušeno 🙂
Prosím, trápím se s programem, aby Arduino přečetlo 8 Byte z paměti
a zobrazilo je na Matrix display a nedaří se…
Luděk
Peťan: Jde o to z jaké paměti a v jakém formátu vypsalo na displej? Doporučuji začít čtením z té paměti a výpisem na sériový port. Až to bude fungovat, tak zkusit něco vypsat na displej. A až bude fungovat i to, tak to „spojit dohromady“.
Hey. Wonderful watch. Thank you! I am looking forward to the new version of the clock with the ability to display seconds on the display.
Peťan: Now, I don’t want do add this function. It requires a big upgrade of code. But in future, I would like to add it.
Thanks a lot for your such a nice project, after perfectly assembly my clock works well
Peťan: Thanks for your feedback. Good to hear it 🙂
Dobrý den,
prosím, jak se tvoří kody pro ty znaky? Jedna matice má 8×8 bodů a
v tabulce pro každý znak je 16 Byte…
a co to je – const uint64_t ?
díky Luděk
Peťan: Na tvorbu znaků používám LED Matrix Editor. Jinak, pro každý znak není použito 16, ale 8 bajtů. Zápis je v šestnáctkové soustavě, takže každý bajt jsou dva znaky (00 až ff) + identifikátor 0x na začátku. 8*8 = 64 bitů – je tedy proměnná unit64_t, což je kladná celočíselná proměnná, která zabírá v paměti 64 bitů. Více najdeš, když si vyhledáš klíčová slova C++ jako třeba „const“ a „uint64_t“.
Díky Peťane, pořád se člověk učí …
Já toto použil jako „mustr“ pro display, kdy potřebuji po RS485 poslat čas a dvě teploty,
a pak je zobrazovat úplně stejně, jako tady to datum a teplota.
Takže nečtu RTC, ale EEPROM 24C32 kam se uloží tyto údaje a tento display to pěkně zobrazí
a navíc čas jedním fontem a teploty druhým fontem, který chci maličko upravit…
🙂 díky
Verze hodin 1.4 je skvělá, už plánuji zabudování do zrcadla.
Teď jsem ale zjistil že při pokusu o změnu parametru „b“ (jas), dojde k restartu mého Arduina Nano
a jas se nezmění. Napadá vás čím to je?
Peťan: Kdy přesně dojde k restartu? A nastavení přes terminál funguje? Program by na to neměl mít vliv, o tomto problému nevím. Napadá mě slabý zdroj – při maximálním jasu to klekne.
Díky za odpověď, zdroj mě nenapadl, je to připojené k PC na USB, možné to je, zítra vyzkouším s lepším zdrojem.
Dojde k tomu vždy když zvýším z 0 na 2. Dál se nedostanu. Přes terminál jsem zatím nezkoušel.
Peťan: Tak to bude tím. Displej je potřeba napájet externím zdrojem – viz schéma.
Tak je to napájením, zároveň jsem zjistil odběr, to USB by to mělo utáhnout, při b0 mám odběr 70mA, při b5 170mA, b10 250mA a b15 310mA, měřená celá sestava, Nano, modul hodin a displej.
Měl jsem to na PC na USB3, to by mělo dát i 800mA, ale stále se to restartovalo.
Když ale snížím napětí z 5V na 4.2V okamžitě se restartuje. Takže asi podpětí, možná levný kabel…
Nádherný projekt. U 6 LED polí jsme provedli malé změny. Líbí se mi a děkuji! Všechno nejlepší!
A beautiful project. We made small changes for 6 LED arrays. I like it and thank you! All the best!
https://www.youtube.com/watch?v=o3XGDLXAf9A
Peťan: Jsem rád, že se konstrukce a úprava programu podařila 🙂 Sem-tam kód aktualizuji a přidám nové funkce. Ale myslím, že teď už toho je tam dost. Přemýšlím ještě o inverzi displeje – těžko říct, jestli by to vůbec někdo využil.
The project is very nice! But I have little problem, blinking dots are in third matrix and two blinking normal but another two blinking fast. Please help me!
Peťan: Hi, I don’t understand what you mean. Coul’d you please add some photo or video? What version of code do you use?
Hi!I use V1.4.My email is … Please, tell me your email to send you video. Thanks for respond and Have a nice day!
Peťan: You can send a mail to info@mylms.cz.
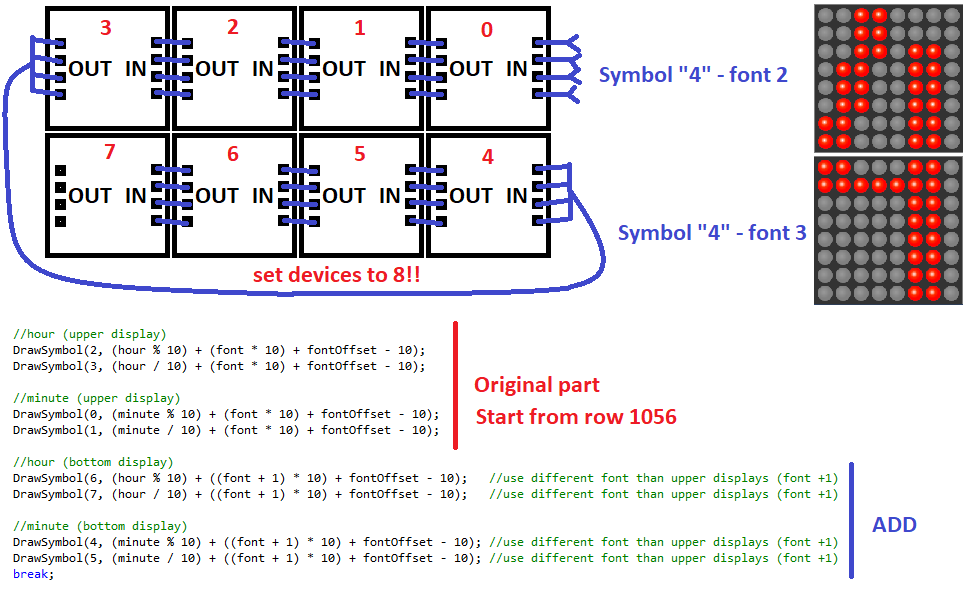
Hello dear friend! How can I add a mapping for max7219 32×16? Like the picture? Fonts I then write himself. Thank you!
Peťan: The simplest way how to add more 4 displays is upgrade two fonts (one for upper display, one for lower display). Then change count of displays (change variable „devices“ to 8) and „DrawTime“ function (see picture). I recommend do not change first font (it’s used for menu) and upgrade #2 and #3 font for uppper and lower display. Of course, you should upgrade the code for draw date and temperature the same way (and drawing colon etc.). You can make new font here.
Thank you, dear friend! I will try!
Petan: I add your program here.
Greetings!
I’ve built version 1.4, it works fine, (thanks again for publishing), my only question is where can I rewrite the code so that the day | month instead of month | day is displayed.
Thanks.
Peťan: Hi, pls see code on GitHub, from line 1067 to 1072. There is a part of code for writing date. You have to change numbers of display in DrawSymbol function. Change 2 > 0 and 3 > 1 for month and 0 > 2 and 1 > 3 for day.
Check if it works. Pls, where are you from?
I’m Hungarian and thank you for your help, it’s been good.
Hi Petan
Could you help me replace the Buttons you use on the Matrix with a simple IR Remote Control (NEC protocol)? Thank you
Peťan: Hi, I did not try to use IR remote control. But you should find some basic example how to read code from IR remote control. If it will works, you just replace rows 393 and 394 where button state are read. For example, If there will be a code for ArrowUp, you’ll set presentButton1 to true, else to false.
First, thanks for the reply.
I have very little experience with Arduino, so could you give me a tip on how to do it?
The control would be this: https://www.ebay.com/itm/2PCS-VS1838-HX1838-Infrared-IR-Wireless-Remote-Control-Sensor-Module-Kit/183914873257
I need to use 3 keys on the Remote Control, say: ‚OK‘ key to enter set mode (menu) and two more keys to set the hour and minutes.
ArrowUp and ArrowDown, for example.
Can you help me by adding / changing the sketch for me?
Thank you very much
Petan: Maybe, I will try to make some software upgrade. But I do not have free time right now. You can try -> First you have to find out code of buttons via some basic sketch. Then add code for read IR remote control code to clock’s sketch. When required code is received, you have to set „presentButtonX“ variable to true/false.
Hi Petan, I worry about bothering you!
The buttons code is this:
Up Arrow: FF629D
Down Arrow: FFA857
Left Arrow: FF22DD
Right Arrow: FFC23D
OK button: FF02FD
Zero: FF4AB5
One: FF6897
Two: FF9867
Three: FFB04F
Four: FF30CF
Five: FF18E7
Six: FF7A85
Seven: FF10EF
Eight: FF38C7
Nine: FF5AA5
Star symbol: FF42BD
Sharp symbol: FF52AD
But from my inexperience, I can’t set the „presentButtonX“ variable to true/false (I don’t know how I do it in code!).
I will be using the IRremote library.
Once again, my thanks
Peťan: I have had added it to version 1.5. You can try it 😉 Do not forget use your buttons code…

Hello dear friend! At what points does the position of the dividing points of the clock change? I want to move them.
Peťan: I’m not sure I understand you. But, If you want to change position of colon (dots between hour and minute) you can see code from line 1179 and 1201 (the same piece of code).
I’m sorry to bother you. Thanks for the help. I changed the font and dots between minutes and hours. But why do they light up unevenly?
https://www.youtube.com/watch?v=3N5QC0PvvLA
else {
//horizontal mode
lc.setRow(adr, j, ByteRevers(row));
//blinking dots on display
//I have to draw „dots“ during draw symbol. In other case it’s blinking.
//Better variant would update symbol before draw – before FOR structure. Maybe in next version 🙂
if (adr == 1, 2, 5, 6 && dotStyle > 0) {
//colon
if (i == 1) lc.setLed(1, 5, 0, showDots); //addr, row, column
if (i == 2) lc.setLed(1, 6, 0, showDots);
if (i == 2) lc.setLed(2, 5, 7, showDots);
if (i == 2) lc.setLed(2, 6, 7, showDots);
if (i == 2) lc.setLed(5, 1, 0, showDots);
if (i == 2) lc.setLed(5, 2, 0, showDots);
if (i == 2) lc.setLed(6, 1, 7, showDots);
if (i == 2) lc.setLed(6, 2, 7, showDots);
}
if (adr == 2 && systemState == 0 && (showMode == 1 || showMode == 2)) {
//date and temperature point
if (i == 5) lc.setLed(adr, 5, 7, true);
if (i == 6) lc.setLed(adr, 6, 7, true);
}
}
if (adr == 0) {
//PM point
lc.setLed(0, 7, 7, pmDotEnable);
}
}
}
Excuse me! It’s all good! There was my mistake!
Peťan: I’m glad your clock works 🙂
Here is my finished project! Many thanks for your help! Great project! If you need a sketch, tell me where to send it.
https://www.youtube.com/watch?v=bsjC5V1Edus
Peťan: Your clock looks very good 🙂 You can use my e-mail address info@mylms.cz
Thanks for nice project.
Just a note, if you use F macro you’ll save a lot (over 10% of RAM/dynamic mem). Instead of Serial.println(„some text“) do Serial.println(F(„some text“)) and strings won’t be initially loaded to memory.
Peťan: Hi, thanks for a good idea. It saved 5% of RAM 🙂 A didn’t hear about this… I have to study more 🙂
Hi Petan,
Your project is awsome and I’m glad you exist !
I’ve been trying to write a code like your’s for weeks and couldn’t get to make it run hehe
I’ve uploaded your code and it works verry weel ut I have a little problem. The dots are not displayed at their right place è-é
Even when I try to disable them, they are still shown but only on the temperature and date displaying…. Any idea on what I could change ?
Hope I didn’t bothered you,
thanks a lot for everything !
Peťan: Which version of firmware do you use? You have to set parameter „:“ to 1 or 2. Colon draw function is around row 1298.
Moc dobrý projekt. Dělám něco podobného akorát s ds1307 a s budíkem. Nevím jaké knihovny použít a jak začít s programem.
Peťan: Osobně bych použil spíše ten DS3231. Je údajně přesnější a pro komunikaci s ním stačí pár řádků (viz článek Kusy kódu k Arduinu). No, jestli nevíš jak začít s programem, tak se třeba koukni na kód k těmto hodinám, nebo nějaké jiné. Na netu je toho dost. Začal bych s rozchozením dílčích věcí – čtení času, ukládání času, zobrazování na displeji. Je to aby sis ověřil jestli ti funguje HW a jestli si schopný třeba vykreslit co potřebuješ na displej.
Dear Petan,
Thank you for excellent project. I have completed the project with Arduino nano and DS3231. It works fine. But there is a problem..
I can’t set the temperature and date to zero . that is I need to display only the time not date and temperature. when I set temp. to 00 (with code t00) and Date to 00 (with code Doo) from serial monitor, auduino receives the code and the clock work with the time only. But when I disconnect the arduino from usb port of my computer and connect with external power supply, it shows the time for about one second and rest of the minutes shows the temperature. Can you give the simple code for horizontal clock only. Thank you again.
Petan: Hi, after receive the data from computer (or set by buttons), setting data are stored in EEPROM. See line 1063 – save data in menu, or lines from 1443 – save data from serial port. Data are restored from EEPROM from line 344. If it does not work, you prabobly have bad EEPROM in your Arduino. Try to change your Arduino module. If you do not want to use temperature and date, you can add „showTemperature = 0;“ and „showDate = 0;“ at the end of setup function.
Clock is horizontaly if parameter „v“ is set to 00. You can send „v00“ to clock via serial monitor.
Dipak : Thank you for your quick response. when I send data by set button it is stored. I set „showTemperature = 0;“ and „showDate = 0;“ Now it works horizontally. But I faced another problem – When power goes off, naturally the display goes off. After resuming the power the clock time remain same as before the power failure. May it be the problem of DS3231 module? Thank you again.
Peťan: Time is „stored“ id DS3231 module, other configuration in EEPROM. Plese see line 243 – this row must be deactivated or deleted. In other case you probably have a bad DS3231 module – some people has problem with it. Try to change CR2032 battery, or chande this module.
Ahoj.
Měl bych dotaz: Při nastavování se mi ve verzi 1.2 objeví „T“ s dvojicí třech svislých teček a potom „T“ s jednou svislou trojicí teček.
V návodu ale tato „sekvence“ není popsána – co to je za nastavení?
Peťan: Jedná se o rotování fontu. V kódu je to popsáno jako „TI“ a „TII“. Od verze 1.3 je parametr „t“ použit pro zobrazení teploty a rotace je řešena parametry „R“ a „r“. V nejnovější verzi ještě doplněny o „U“ a „v“. Doporučuji používat novější verzi – alespoň 1.4 (ve verzi 1.5 je možné ovládat hodiny dálkovým ovladačem).
Děkuji za info. Myslím, že verze 1.4 je pro mě zbytečná.
Cituji:
Od verze 1.4 je možné otočit text tak, aby byl čitelný vertikálně (parametr v00/v01). Lze tedy hodiny použít na výšku. Dále je možné připojením vstupu D10 a/nebo D11 na GND zobrazit jeden ze třech textů. Ty je nutné upravit přímo v kódu.
–
Otočení neplánuji; zobrazení textu také nepotřebuji.
—
Nicméně napadl mě ještě jeden dotaz: Když je např. 9:00, tak hodiny zobrazí „09:00“. Jak lze upravit kód aby se ta „0“ před devítkou nezobrazovala?
Děkuji
Peťan: Je pravda, že pokud člověk tyto věci nepotřebuje, není verze 1.4 a novější potřeba. Snažím se udělat tyto hodiny co nejvíce univerzální.
Na řádku 1159 je kód k vykreslování desítek hodin. Stačí ho vykreslovat s podmínku, pokud je hodina větší než 9 -> if(hour > 9){DrawSymbol(3, (hour / 10) + (font * 10) + fontOffset – 10);}.
Ahoj
Tak jsem zkoušel upravit tu část kódu ( pro verzi 1.2 jsem to našel na řádce 802) ale stále zobrazuje tu první nulu.
Nemůže to býti ještě někde jinde?
Peťan: Ve verzi 1.2 je to na řádku 841. Nahradil bych tento řádek tímto kódem if(hour > 9){DrawSymbol(3, (hour / 10) + (font * 10) + fontOffset – 10);}else{DrawSymbol(3, 0);}
Do verze 1.6 možná tuto funkci přidám nativně (aby se to dalo zapínat/vypínat v menu).
Tak už to funguje – děkuji 🙂
—
Ještě takový nápad: Přes den na „plném“ světle musí svítit více ale za šera či tmy by stačilo méně. Šlo by to regulovat třeba fotoodporem?
Peťan: Asi by nebyl problém to přidat a doprogramovat. Displej umožňuje změnu intenzity myslím v nějakých 15 úrovních. Jednoduché by bylo třeba podle času měnit intenzitu osvětlení. Hodiny vznikly tak, aby obsahovaly co nejméně věcí – Arduino, RTC, displej a dvě tlačítka. Teď už lze připojit další dvě tlačítka a IR přijímač. Uvidím, možné do verze 1.6 přidám ten fotoodpor, nebo spíše změnu intenzity svitu podle času.
Nemyslím si že změna dle času je dobrá: v létě je to jinak a v zimě taky. 🙂
Peťan: To je pravda… Je tam i datum, tak by to šlo řešit jako astronomické hodiny. Zadala by se přibližná hodina a zeměpisná šířka… Ale teď na to nemám čas
Hay thanks for this nice project, I tried it working nice for me along all features. I want to show SUNRISE and SUNSET time, half hour before and half hour after, I cant figure out how to do this. Found an Arduino library which calculates these times based on specified longitude and latitude values.
Hay Petén, Thanks for this project, I use your code and build my clock which is working fine.
I change buttons But IR Remote is not working with clock,
I tried and add some more features in your code.
these features are added.
1. Single buzzer tone after hour. (M = 0)
2. Double buzzer tone after half hour (M = 30)
3. Alarm function
Everything can be set through serial monitor and buttons.
soon will upload a demo video
Petan: Thank you, I’m going to check your sketch and then I will add it on this page.
Hello dear friend! I really look forward to completing your project with a single sound buzzer in an hour!
Hello! I assembled the watch and it works perfectly! In the video you say that the temperature in the program code can be compensated! I want to show with +3 C from the actually measured. Is this possible?
Thanks in advance!
Peťan: Hi, of course. You can change temperature offset. Just look at line 125. You have to change this value to 103 (add 3°C)
Hello! I assembled the watch and it works perfectly! In previous comment I tell you about some features which I added. Now I am trying to add sunrise and sunset time to show on matrix based on user defined longitude and latitude. Found library which measure sunrise and sunset time. but I am getting facing problem while displaying on matrix.
//sunset hours
DrawSymbol(1, time2[0] + fontOffset );
DrawSymbol(0, time2[1] + fontOffset );
//sunset minute
DrawSymbol(3, time2[3] + fontOffset);
DrawSymbol(2, time2[4] + fontOffset );
time2 array hold sunset hour and minutes. time2[*] return single digit of hour and minute.
but I getting this on matrix.
https://drive.google.com/file/d/10aSspkWyWxYy6Zdyqzh3UA-rI7Jb2T10/view?usp=sharing
Peťan: Hi, first thing you should try is you write variable „time2[x]“ to serial port. This variable must contain only one digit (0 – 9). Probably, there is bigger number and it reads from bad memory cells. Or you can send sketch to my mail (info@mylms.cz) and i will try check it. But unfortunately, now I do not have much free time.
Tried this
Serial.println(time2); This return time in 24 hour format 18:27
Serial.println(time2[0]); this return tens of hours 1
Serial.println(time2[1]); this return one’s of hours 8
Serial.println(time2[2]); this return colon :
Serial.println(time2[3]); this return tens of minutes 2
Serial.println(time2[4]); this return one’s minutes 7
also sent sketch through email.
Petan: Hi, I did not received any mail yet. But, I have an idea. Try to substract 48 from time2[x]. For example „DrawSymbol(1, time2[0] + fontOffset – 48);“. I thing, you time2[x] variable contain ASCII code of symbol – no exact value. Maybe…
Work fine. I am working on an app that can control the functions of the clock.
Zdravím,hezký projekt,jen se chci zeptat zda by se dalo přidat venkovní čidlo jako např. DS18B20
díky.
Peťan: Určitě by šlo čidlo přidat. Stačilo by importovat knihovnu a teplotu z čidla načítat ve funkci „GetTemperature()“. Akorát proměnné pro načítání teploty jsou pouze byte, takže by se muselo ještě pořešit toto.
V této verzi načítání teploty přidávat nebudu. Možná u dalších hodin…
Díky, budu si hrát, těším se na další projekt s hodinami.
Peťan: Zatím na další projekt rozhodně není čas. Ale chtěl bych udělat nějaký univerzální zobrazování třeba i se zobrazení odběratelů na YouTube, nebo tak něco.
Ahoj !
Náhodou jsem narazil na netu na tvoji konstrukci, líbila se mi , tak jsem to postavil a nahrál verzi 1.4. Jediné co mi trochu kazí celkový dojem je „0“ před devítkou, jinak se mi hodiny moc líbí. Četl jsem výše úpravu kódu, ale nedokázal jsem příslušný příkaz změnit, jsem zatím naprostý začátečník. Děkuji za pomoc.
M.
PS: Moc by se mi líbila možnost měření teploty připojením externího čidla DS18B20.
Peťan: Co máš na mysli „0“ před devítkou? Jako že se hodiny zobrazují vždy dvojciferne (05, 08, 10)? To se dá jednoduše pořešit podmínkou. Desítky hodin se ve verzi 1.4 vykreslují na řádku 1058.
Externí čidlo zatím neplánuju. Chtěl jsem, aby hodiny byly naprosto jednoduché, pouze se dvěma tlačítky. Možná u nějakého dalšího kusu. Mám v plánu udělat „zobrazovátko“ na počet odběratelů na YouTube s hodinami a možná tam zabuduju teploměr/vlhkoměr.
Protože nemám zkušenosti, můžeš mi napsat jak ten řádek 1058 bude s tou podmínkou vypadat. Zkoušel jsem to co jsi psal „JirkoviK“, ale nefungovalo mi to. Při ověřování mi to vypsalo chyby. Asi jsem to nenapsal správně, podle pravidel.
Díky.
Peťan: Co si tam napsal? Jakou to hodilo chybu?
Ten řádek bude vypadat úplně stejně, jak jsem psal v tom předchozím komentáři pro „JirkaK“. Akorát bude ve verzi 1.4 na řádku 1058. if(hour > 9){DrawSymbol(3, (hour / 10) + (font * 10) + fontOffset – 10);}else{DrawSymbol(3, 0);}.
Původní příkaz na ř. 1058 jsem nahradil, tím co jsi poslal “ if(hour > 9){DrawSymbol(3, (hour / 10) + (font * 10) + fontOffset – 10);}else{DrawSymbol(3, 0);}.“
A vypsalo to následující:
Arduino: 1.8.8 (Windows 10), Vývojová deska: „Arduino Nano, ATmega328P (Old Bootloader)“
ArduinoMatrixClock:1058:9: error: stray ‚\342‘ in program
ArduinoMatrixClock:1058:9: error: stray ‚\200‘ in program
ArduinoMatrixClock:1058:9: error: stray ‚\223‘ in program
C:\…\MaticovĂ© hodiny Arduino\Arduino-Matrix-Clock-1.4\Arduino-Matrix-Clock-1.4\ArduinoMatrixClock\ArduinoMatrixClock.ino: In function ‚void WriteTime()‘:
ArduinoMatrixClock:1058:79: error: expected ‚)‘ before numeric constant
ArduinoMatrixClock:1058:107: error: expected primary-expression before ‚.‘ token
exit status 1
stray ‚\342‘ in program
Táto zpráva by měla mít víc informacií v
„Zobrazení podrobného výstupu při kompilaci“
podle zapnuté volby v Soubor -> Nastavení.
Peťan: Ručně přepiš v tom řádku „mínus“ za mínus. On totiž WordPress automaticky změnil pomlčku/mínus za oddělovač. Na první pohled to vypadá téměř stejně. Viz obrázek… Ve druhém řádku je to špatně. Sorry 🙂

Ps.: Pokud začínáš, aspoň vidíš, že překladač není někdy úplně moudrej a někdy tě úplně dobře nenasměruje. Kolikrát ani neukazuje na strávný řadek. pokud vynecháš třeba středník, je běžné, že chyba je o řádek výš atd., atd., atd.
Díky moc, už to funguje, člověk si to hned neuvědomí a taky budu muset jít pro nový brýle.
Budu se těšit na případné další verze.
Pěkný večer.
Peťan: Jsem rád, že se nakonec zadařilo. Snad budou hodiny sloužit 😉
Hy. I want to ask one thing. Is it possible to change font style on every minute change automatically? If yes then what changes in code should done to make this work?
Peťan: Yes, every upgrades are possible. Just change code… You can try add this part of program on line 480. It changes font style every minute. Do not forget add variable „lastMinute“ on line 147.
//60 second timer
if (minute!= lastMinute) {
font++;
if(font > fontCount ){font = 1;}
}
lastMinute = minute; //at the end of the loop function (line 1084)
Tried this but not work for me. Double check and correct me if there are any mistake. Here is image of my pasted code. https://freeimage.host/i/sCJhEg
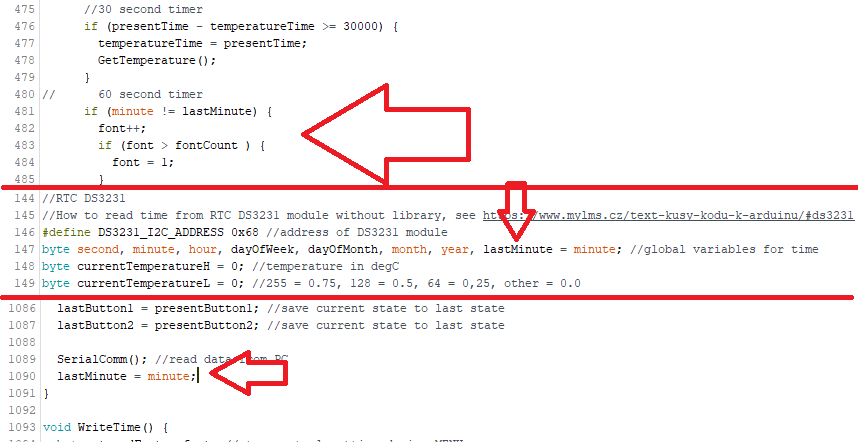
Peťan: You have mistake on line 147. You should write „byte second, minute, hour, dayOfWeek, dayOfMonth, month, year, lastMinute; //global variables for time„.
Corrected but not working,
Hay Hope Everyone is fine. I have this clock from quite of time, Working like charm but sometime some issues occur.
1. Sometime when electricity turned from grid station and after some time electricity got restored, Clock shows only top row of SECOND and sometime FOURTH digit. Then I need to turn of power supply outlet and then turn it on again. after that it works as expected.
Reference Image
https://freeimghost.net/i/5IlBD
If time is 11:00 Then it shows as in image.
2. Sometime after restoration of electricity RTC lost the time and then it starts from 12:00 GMT with 1.1.2000, Need to set it again with correct time.
What are the reasons of these issues and how to overcome?
Peťan: Hi, I did not have this kind of issue. Maybe you have bad stability of dc power source… You can try add more time (change 10 to 1000) in line 410 – here https://github.com/mylms/Arduino-Matrix-Clock/blob/1.5/ArduinoMatrixClock/ArduinoMatrixClock.ino#L410
Hi
Great code,
I thought about a slightly wider font and prepared one based on another example found on the Internet.
But there is a problem – it is that on the first display the font in version „left of display“ is displayed too close to the left edge and touches the dots.
In version „center of display“ font is to close to right edge of display
https://freeimghost.net/i/1.uA2Ha
I analyzed the code a bit, but I can’t create a function only for 1 display , e.g. DrawSymbol2,
which will allow me to display only for 1 display a font moved one column to the right or left.
this is my font version „left of display“
https://freeimghost.net/i/left.uA1Al
0x1e3333333333331e,
0x1e0c0c0c0c0c0e0c,
0x3f03060c1830331e,
0x1e3330301c30331e,
0x30303f3333363c38,
0x1e3330301f03033f,
0x1e3333331f03331e,
0x0c0c0c0c0c18303f,
0x1e3333331e33331e,
0x1e33303e3333331e
and this is my font version „center of display“
https://freeimghost.net/i/center.uAsbq
0x3c6666666666663c,
0x3c18181818181c18,
0x7e060c183060663c,
0x3c6660603860663c,
0x60607e66666c7870,
0x3c6660603e06067e,
0x3c6666663e06663c,
0x181818181830607e,
0x3c6666663c66663c,
0x3c66607c6666663c
Best
Maciek
Peťan: Hi, you can just add both fonts to the program – for example font#1 (left aligned) and font#2 (centered). Then in row 1163 change red-highlighted text to „(font + 1) * 10“ – see pic. https://www.mylms.cz/wp-content/uploads/2023/10/comment-9409.png That symbol will draw by font#2. Other symbols will draw by font#1
Thanks, works perfect
I’m still thinking about how to turn off the front zero within e.g. 01:21 or 09.00 °C
but I haven’t come up with anything yet, I wanted to set it as a condition somehow, but I have no ideas for now and I’m not that knowledgeable about code
BTW – I made 3 symbols
https://xantorohara.github.io/led-matrix-editor/#21e2a4e815274587 AM/PM
https://xantorohara.github.io/led-matrix-editor/#0070981818189b73 degrees C low
https://xantorohara.github.io/led-matrix-editor/#7098181818189b73 degrees C high
Peťan: You can change code in row 1058 (similar in row 1068 for date and 1080 for temperature) to this -> „if(hour > 9){DrawSymbol(3, (hour / 10) + (font * 10) + fontOffset – 10);}else{DrawSymbol(3, 0);}„. First zero will hide. If you agree I’m going to add your symbol to code on GitHub.
Thanks,
works perfect again
I’m glad that my characters will be in the project.
I am also sending the final versions of the high left and center font
I guess the last thing that bothers me as a graphic designer is colon on tempertaure
it currently looks like this
https://xantorohara.github.io/led-matrix-editor/#3c18181818181c18|3f83860c1830331e|3c6660603860663c|7098181818189b73
I wanted to move it a point lower – and almost I even managed to do it, but the colons flashed and were almost invisible.
https://xantorohara.github.io/led-matrix-editor/#3c18181818181c18|bf83060c1830331e|3c6660603860663c|7098181818189b73
Final version of the font
left font
https://xantorohara.github.io/led-matrix-editor/#1e3333333333331e|1e0c0c0c0c0c0e0c|3f03060c1830331e|1e3330301c30331e|30303f3333363c38|1e3330301f03033f|0c0c0c0c1830303f|1e3333331e33331e|1e33303e3333331e
center font
https://xantorohara.github.io/led-matrix-editor/#3c6666666666663c|3c18181818181c18|7e060c183060663c|3c6660603860663c|60607e66666c7870|3c6660603e06067e|3c6666663e06663c|181818183060607e|3c66607c6666663c
colon on tempertaure > one colon and move it a point lower
if (adr == 2 && systemState == 0 && (showMode == 1 || showMode == 2) && !showText) {
//date and temperature point
//if (i == 5) lc.setLed(adr, 5, 7, true);
//if (i == 6) lc.setLed(adr, 6, 7, true);
if (i == 7) lc.setLed(adr, 7, 7, true);
}
}